Multiple Use Microscopy Calibration and AFM Profilometry MRS-6
Multiple Use Microscopy Calibration and AFM Profilometry MRS-6
MRS-6 Magnification Reference Standard
1,500x - 1,000,000x

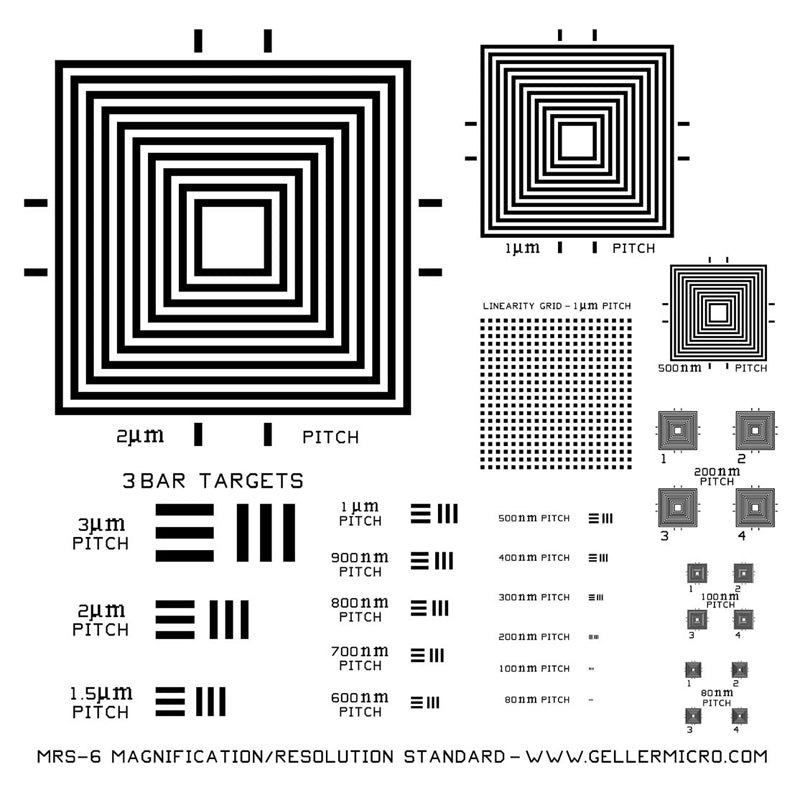
- 0.08, 0.1, 0.2, 0.5, 1, and 2µm PITCH PATTERNS
- 3 BAR PATTERNS from .08 TO 3µm
- 1µM PITCH TEST GRID X 20µm
- ± 3 NM INDIVIDUAL PITCH 2σ UNCERTAINTY!
- ± 2NM CUMULATIVE PITCH 2σ UNCERTAINTY

Micrograph of the 100nm PITCH
located bottom right corner
This is the next generation, NIST and NPL (NIST counterpart in the U.K.) Traceable, Magnification Reference Standard & Stage Micrometer. For Instrument Calibration from 1,500x – 1,000,000x (80nm min. pitch).
- Electron Microscopy: SEM and FIB/SEM (secondary & backscattered electrons), TEM (for use with a bulk holder) the MRS-6 is conveniently sized at 3.2 x 3.2 x 0.5mm.
- Scanning Microscopies and Profilometry: STM, AFM, stylus and optical, etc. The pattern height is approximately 15nm.
- Optical Microscopy: reflected, bright/dark field, differential contrast, and confocal.
- Chemical Mapping: EDS, WDS, Micro/Macro XRF, XPS, Auger, and others. The pattern is fabricated using 15nm chromium over single crystal silicon.
- Resolution Testing: With a series of 2 bar targets (similar to the USAF 1953 patterns) ranging in size from 80nm to 3µm.
- Linearity Testing: With a 1µm² pitch over 40 x 40µm.
-
A Standard Ahead of Its Time: The MRS-6 represents a challenging next step. The nanotechnology sized patterns will be a good test of your imaging systems.
- Advanced optical microscopes now have submicrometer test patterns to measure resolution and linearity.
- Scanning electron microscopes have a pattern that will show significant differences between backscattered and secondary electron type I and type II images. Imaging the pattern will also tax their low accelerating voltage capabilities.
- Scanning probe microscopes have a pattern that is closely sized to the finest cantilever tips challenging their resolution ability.
Introduction
Introducing the MRS-6, the next level in a series of magnification calibration standards (the MRS-1, MRS-3 and MRS-4 are currently still available). The MRS series of calibration standards are highly accepted pitch standards, with well over 1,000 being used in laboratories around the world including national laboratories in the US, UK and Germany. Industrial customers include Intel, AMD, and IBM. The MRS-6 is offered as a certified reference material (a traceable standard) or, optionally, without traceability. Also offered is a cleaning service and a recertification program, as required by international quality standards such as ISO, QS-9000 and ISO-17025.
Details on MRS-6 Design, Traceability, Magnification Requirements
| Pattern | Pitch Spacings | |||||
|---|---|---|---|---|---|---|
| Nested boxes |
2µm | 1µm | 500nm | 200nm 4 each |
100nm 4 each |
80nm 4 each |
| 3 bar targets |
3µm | 2µm | 1µm | 1.5µm | 1µm | 900nm |
| 3 bar targets continued |
800nm | 700nm | 600nm | 500nm | 400nm | 300nm |
| 3 bar targets continued |
200nm | 100nm | 80nm | |||
Construction
- 3.2mm x 3.2mm x 0.5mm thick silicon die with thin 15nm Cr deposit pattern, fully conductive, excellent edge definition.
- Pitch is defined as a cycle, the distance of a bar plus space.
- Optional retainer & mounting available
Traceability
The MRS-6 is traceable to the National Physical Laboratory (NPL) in the U.K. NPL IS the counterpart to NIST in the U.S. There is a mutual recognition agreement between NIST and NPL recognizing each others' measurements.
Geometric Design
It should be noted that some high resolution standards are traceable through optical diffraction methods to determine the pattern frequency which does not account for frequency variations in the pattern. We do it correctly, measuring and providing traceability to the individual pattern.
Retainer & Mounting Options for SEM
 |
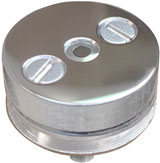
The MRS-6 Calibration Standard comes unmounted to give the customer the flexibility to mount the standard on the position or stub they wish. We offer two retainer & mounting options; MRS-6 on either Ø1/2" (12.7mm) pin stub or Hitachi Ø15mm x 6mm stub. These mounting options have to be ordered additional to the MRS-6 at the time of ordering. |
To avoid contamination of your MRS Standard, we recommend storing the standard under vacuum. For MRS Standards mounted on pin stubs the PELCO® SEM Sample Stub Vacuum Desiccator would be ideal.
Documentation
Documentation


